Authentication
You’ve created two resources for your Ticketee application: projects and tickets. And in the last chapter you added some CSS stylings to make things look good.
In this chapter, you’ll add authentication to let users sign in to your application. With this feature, you will be able to track which tickets were created by which users.
In the chapter after this one, you’ll use these user records to allow and deny access to certain parts of the application.
The general idea behind having users for this application is that some users are in charge of creating projects (project owners) and others use whatever the projects provide. If they find something wrong with it or wish to suggest an improvement, filing a ticket is a great way to inform the project owner about their request
In this chapter, you’ll add authentication to your application using a gem called Devise[1]. Devise has been proven time and time again to be a capable gem for authentication, and so that is what we’ll be using here. Most of the functionality for this chapter will come from within Devise itself.
After adding Devise, we’ll only allowed signed-in users to create tickets. When they do, we’ll link those tickets to the users who created them, and display that information on the tickets listing on the projects/show page, as well as on the tickets/show page itself.
Using Devise
Devise is a gem which provides the authentication features that nearly every Rails application needs, such as user registration, sign in, password reset emails and confirmation emails. We’re going to cover the first two of those in this chapter.
When a user signs up with Devise, their credentials are stored securely in a database using industry-standard cryptography. If we were to build authentication ourselves, then the cryptography methods that we choose may not be as strong. Devise saves us from having to worry about these things.
Let’s install the Devise gem now by adding it as a dependency of our application:
bundle add devise -v '~> 4.8.1'
Next, we’ll need to run the generator which will install Devise:
$ rails g devise:install
This generator will create an initializer at config/initializers/devise.rb,
which contains the configuration for Devise. The files in config/initializers are run during the process of booting a Rails application and are used to
setup anything that is necessary for the application to run. In this case,
Devise’s configuration sets the scene for Devise use later on in our
application.
The devise:install generator makes our application ready for Devise by
setting up some default configuration, but it’s the devise generator which
does the hard work of adding in the major pieces. Let’s run this command now:
$ rails g devise user
This generator generates a User model, which will be used to keep track
of users within our application. Along with this comes a migration to generate
a users table, so let’s run this command to apply this new migration to our database:
$ rails db:migrate
This model contains configuration specific to Devise:
class User < ApplicationRecord
  # Include default devise modules. Others available are:
  # :confirmable, :lockable, :timeoutable, :trackable and :omniauthable
  devise :database_authenticatable, :registerable,
         :recoverable, :rememberable, :validatable
end
The devise method in this model sets up the model to use the specified
Devise modules. By default the modules and features that Devise provides with
this default config are:
-
database_authenticatable- Allows the user to sign in to your app using credentials stored in the database, such as an email address and password. -
registerable- Users can register or sign up to our application. -
recoverable- If a user forgets their password, they can reset it via email. -
rememberable- A user’s session in our application will be remembered. This means they won’t have to sign in every time they restart their browser. -
validatable- Validates the user’s email address and password length. By default, passwords are expected to be between 8-128 characters. This setting can be changed inconfig/initializers/devise.rbby altering theconfig.password_lengthvalue.
As you can see just from this list, Devise offers us quite a lot! It even has
more, as listed in the comment above the devise method:
-
confirmable- Requires a user to confirm their email address by clicking a link in a confirmation email, before they can sign in. -
lockable- Provides extra security by automatically locking accounts after a given number of failed sign in attempts. -
timeoutable- Provides extra security by automatically logging out users who haven’t been active in a given amount of time. -
omniauthable- Adds support for Omniauth[2], which will allow user to authenticate with your app via an external service, such as Facebook or Twitter. -
trackable- Tracks information such as last sign in time and IP for each user.
We won’t be using any of these advanced modules, but it’s good to know that they’re there, and they’re built in and well supported.
|
Beware race conditions with a uniqueness validator
One of the validations that Devise’s This uniqueness validator works by checking to see whether any records matching the
validation criteria exist in the database already. In our case, the validator
checks if there are any A problem arises if two connections to the database both make this check at almost exactly the same time. Both connections will claim that no such records exist, and therefore each will pass validation and allow the record to be saved, resulting in non-unique records. A way to prevent this is to use a database uniqueness index so that the database, not Rails, does the uniqueness validation. For information how to do this, consult your database’s manual. Although this problem doesn’t happen all the time, it can happen, especially on more larger and more popular sites, so it’s something to watch out for. |
The devise generator also adds a line to config/routes.rb:
devise_for :usersOne little line like this generates a bunch of routes for our application, which
we can see when we run rails routes -c devise:
| Prefix | Verb | URI Pattern | Controller#Action |
|---|---|---|---|
new_user_session |
GET |
/users/sign_in |
devise/sessions#new |
user_session |
POST |
/users/sign_in |
devise/sessions#create |
destroy_user_session |
DELETE |
/users/sign_out |
devise/sessions#destroy |
new_user_password |
GET |
/users/password/new |
devise/passwords#new |
edit_user_password |
GET |
/users/password/edit |
devise/passwords#edit |
user_password |
PATCH |
/users/password |
devise/passwords#update |
PUT |
/users/password |
devise/passwords#update |
|
POST |
/users/password |
devise/passwords#create |
|
cancel_user_registration |
GET |
/users/cancel |
devise/registrations#cancel |
new_user_registration |
GET |
/users/sign_up |
devise/registrations#new |
edit_user_registration |
GET |
/users/edit |
devise/registrations#edit |
user_registration |
PATCH |
/users |
devise/registrations#update |
PUT |
/users |
devise/registrations#update |
|
DELETE |
/users |
devise/registrations#destroy |
|
POST |
/users |
devise/registrations#create |
These routes are all for controllers within Devise. Devise is not only a gem, but also a Rails engine[3]. This means that it contains its own set of controllers and views which exist outside of the application. This keeps our application’s code separate from Devise, giving us less code to manage overall.
With Devise installed and configured, let’s go about adding the ability for users to sign up in our application with Devise.
Adding sign up
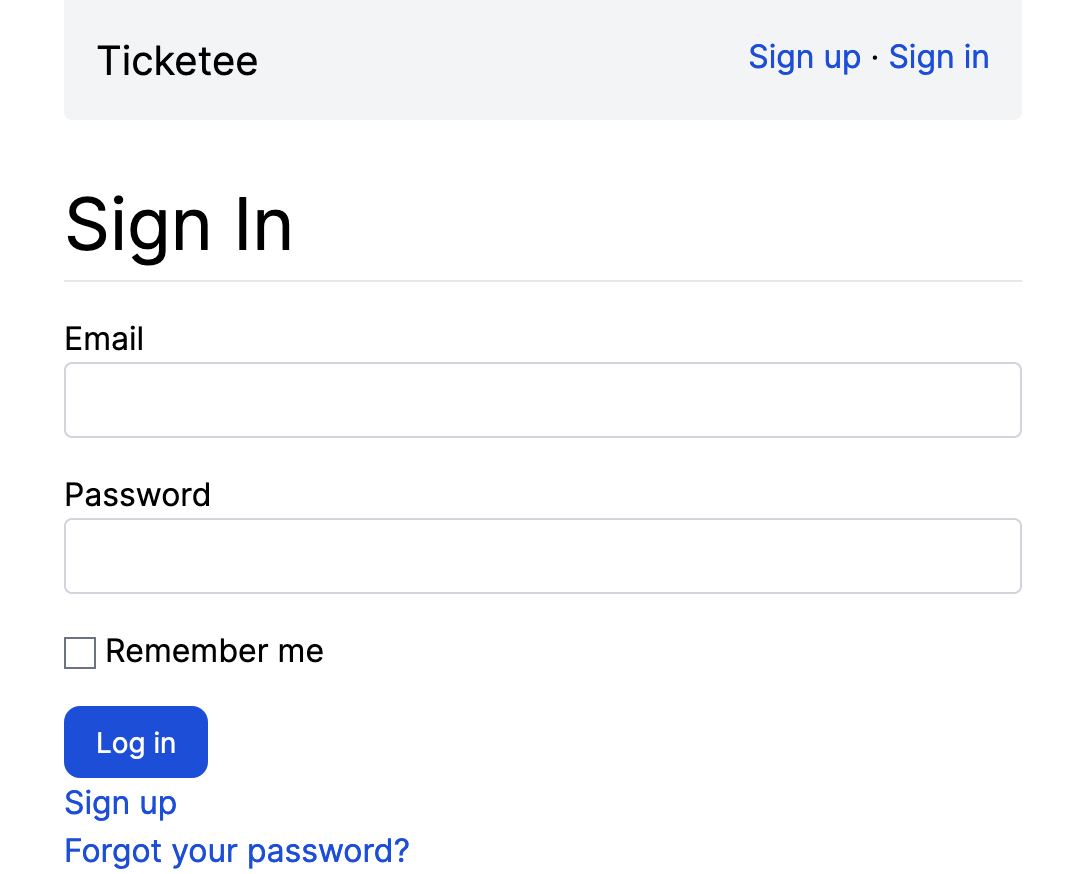
Let’s add a feature to Ticketee to let our users sign up for a new account. When we’re done with this feature, users will be able to sign up in our application by clicking a link in Ticketee’s navigation bar called "Sign up". When they click that link, they’ll see this page:
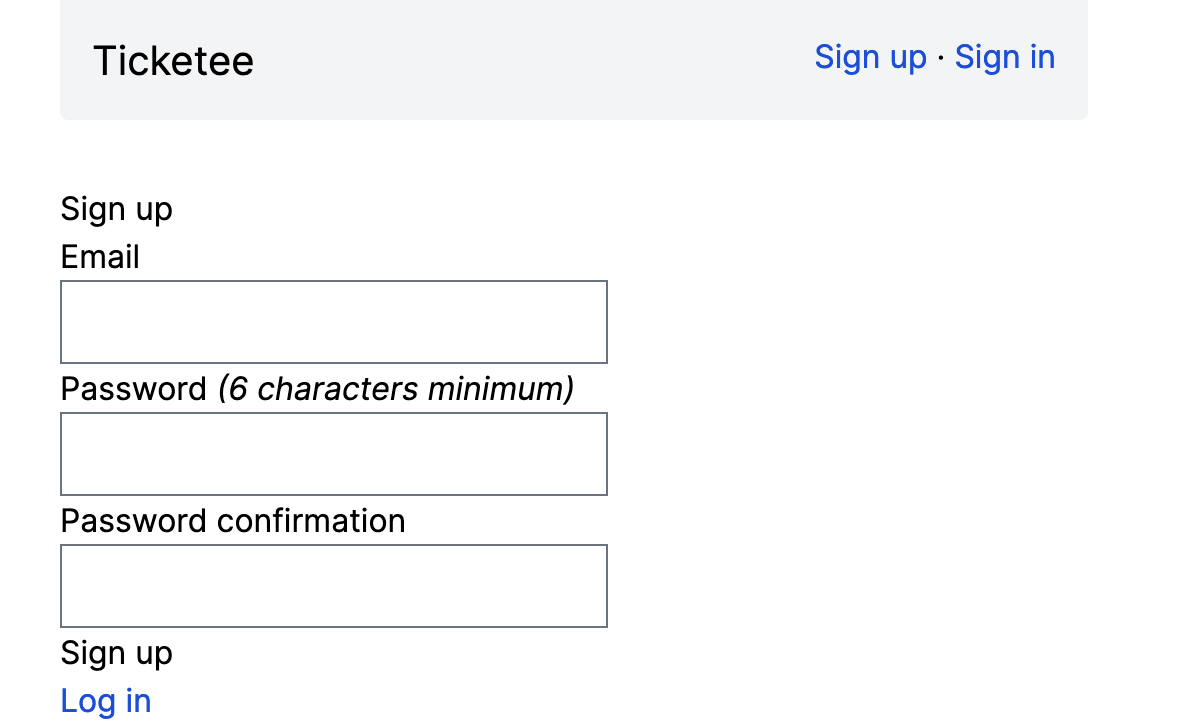
You can see this page by going to http://localhost:3000/users/sign_up now, if you wish.
From here, they’ll be able to enter their email address and password, and sign up to our application. From then on, they can come back to our application and sign in and use the application to their heart’s content.
To make sure that this feature works, we’re going to write a test for it in
spec/features/signing_up_spec.rb, using the code from the following listing:
require "rails_helper"

RSpec.feature "Users can sign up" do
  scenario "when providing valid details" do
    visit "/"
    click_link "Sign up"
    fill_in "Email", with: "test@example.com"
    fill_in "Password", with: "password"
    fill_in "Password confirmation", with: "password"
    click_button "Sign up"
    expect(page).to have_content("You have signed up successfully.")
  end
end
While this might seem silly - after all, Devise provides all of this functionality to us, and Devise already has its own tests - this can prevent very silly mistakes, such as changing the view and accidentally introducing a bug that prevents people from signing up.[4] Besides, the test is very straightforward - it just walks through the process that we just described. It navigates to the homepage, clicks a "Sign up" link and then proceeds to sign up.
Now when we run our test with bundle exec rspec spec/features/signing_up_spec.rb we’ll
see this error:
1) Users can sign up when providing valid details
   Failure/Error: click_link "Sign up"
   Capybara::ElementNotFound:
     Unable to find link "Sign up"
This one is easy enough to fix. We’re just missing a link to "Sign up" in our
application. This would be a good time to add a nav bar to the top of our site that would contain that sign up link. Let’s handle that now by changing app/views/layouts/application.html.erb, and changing the div inside the body to this:
 <div class="mx-8 lg:mx-64 md:mx-32">
  <div class="mb-8 bg-gray-100 p-4 rounded-b flex">
    <h1 class="text-xl">Ticketee</h1>
    <div class="ml-auto">
      <%= link_to "Sign up", new_user_registration_path %>
    </div>
  </div>
  ....
We could extract these styles out into application.tailwind.css, but given that they’re only used here, we’ll keep them here for the moment. We should only extract styles out if they’re repetitive, or we anticipate using them elsewhere in the near future.
Here’s what that new nav bar will look like:
The new_user_registration_path helper is provided by Devise, and you can see
it and its brethren by running rails routes -c devise, as we showed above. We’re not just pulling these out of the air here!
With that link in place, our test should run a little further:
1 example, 0 failures
Oh that’s surprising! It’s all passed. The only thing that we needed to do was to add the "Sign up" link. Devise provides us with the rest.
Let’s run all of our tests now to ensure that we haven’t broken anything. Run
bundle exec rspec to see this:
16 examples, 0 failures, 1 pending
We have one pending spec at spec/models/user_spec.rb, which came from the
devise generator. Let’s remove this and re-run bundle exec rspec:
15 examples, 0 failures
That’s better! With that all done, let’s make a commit:
$ git add .
$ git commit -m "Added Devise + sign up feature"
$ git push
With users able to sign up to our application, the next thing that we can add is the ability for them to sign in.
Adding sign in and sign out
Devise allowed us to easily add a sign up feature to our application. Now
let’s see about adding a way for users to sign in and out of our application.
To start with again, we’ll add a new feature spec at spec/features/signing_in_spec.rb
using the code from the following listing.
require "rails_helper"
RSpec.feature "Users can sign in" do
let!(:user) { FactoryBot.create(:user) }
scenario "with valid credentials" do
visit "/"
click_link "Sign in"
fill_in "Email", with: user.email
fill_in "Password", with: "password"
click_button "Log in"
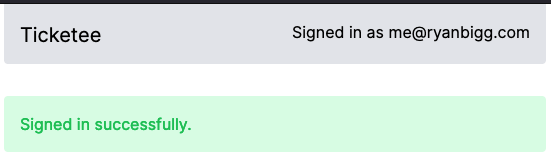
expect(page).to have_content "Signed in successfully."
expect(page).to have_content "Signed in as #{user.email}"
end
endIf this test looks very similar to our "Sign up" feature, that’s because it
is! The two flows are very similar. In this test, the difference is that we’re
creating a user using a FactoryBot factory, and then signing in as that
user.
When we run the test with bundle exec rspec spec/features/signing_in_spec.rb we’ll
see that the user factory is missing:
1) Users can sign in with valid credentials
   Failure/Error: let!(:user) { FactoryBot.create(:user) }
   KeyError:
     Factory not registered: "user"
Let’s create this new factory file at spec/factories/user.rb:
FactoryBot.define do
  factory :user do
    sequence(:email) { |n| "test#{n}@example.com" }
    password { "password" }
  end
end
This factory can be used to create new users in our tests. The sequence
method will generate sequential email addresses for our users, such as
"test1@example.com" and "test2@example.com". We’re doing this so that each
user has a unique email address, and that will keep Devise’s unique email
validation happy.
When we run our test again, we’ll see that it can’t find the "Sign in" link:
1) Users can sign in with valid credentials
   Failure/Error: click_link "Sign in"
   Capybara::ElementNotFound:
     Unable to find link "Sign in"
Let’s add this underneath the "Sign up" link in app/views/layouts/application.html.erb:
<div class="ml-auto">
<%= link_to "Sign up", new_user_registration_path %>
·
<%= link_to "Sign in", new_user_session_path %>
</div>The new_user_session_path is another routing helper provided by Devise, this
time to a SessionsController. When we run our test again, it will go all the
way up to the last step:
1) Users can sign in with valid credentials
   Failure/Error: expect(page).to have_content "Signed in as
   #{user.email}"
     expected to find text "Signed in as test1@example.com" in "Ticketee
     Toggle navigation Home Sign up Sign in Signed in successfully..."
This final line of the feature is checking that a message on the page
indicates to the user which email address they’ve used to sign in. This can be
useful in situations where a computer may be shared. We’re going to put this
line in app/views/layouts/application.html.erb, but we don’t want it to show
all the time. Conversely, it’s not useful for the sign in or sign up links to
appear when the user has already signed in. Therefore we’ll hide those links
when the user is signed in, and replace them with this "Signed in as…" message.
Let’s do this by changing this content in app/views/layouts/application.html.erb:
<div class="ml-auto">
<%= link_to "Sign up", new_user_registration_path %>
·
<%= link_to "Sign in", new_user_session_path %>
</div>To this:
<% unless user_signed_in? %>
<div class="ml-auto">
<%= link_to "Sign up", new_user_registration_path %>
·
<%= link_to "Sign in", new_user_session_path %>
</div>
<% end %>Then immediately after the ul.nav.navbar-nav tag that those li tags are
contained within, add this code:
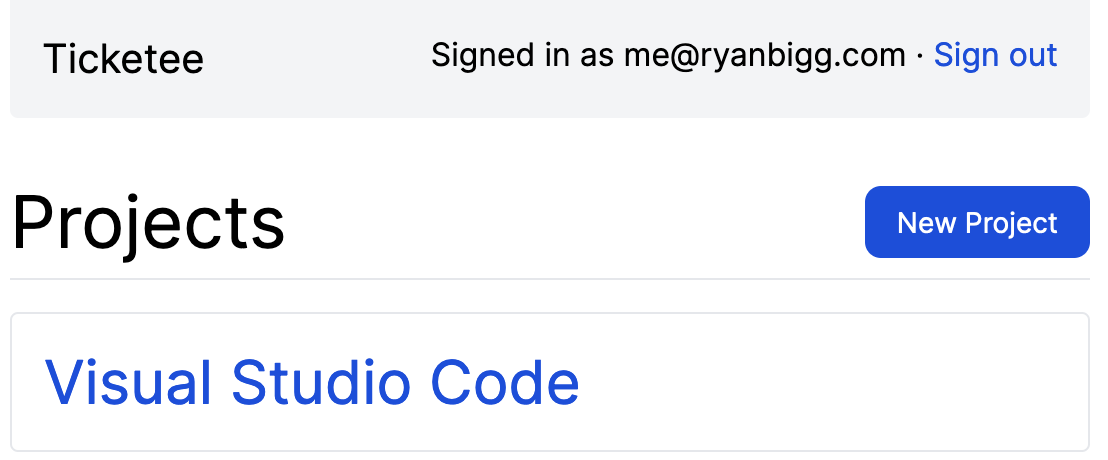
<% if user_signed_in? %>
  Signed in as <%= current_user.email %>
<% end %>
This new code uses two new methods: user_signed_in? and current_user. Both
of these methods are provided to us by Devise and both methods do exactly as
they say. The user_signed_in? method returns true if the user is signed
in, otherwise it returns false. The current_user method will return either a User
instance which represents the current user, or nil if the user isn’t signed
in. With these two methods we’ve hidden the "Sign up" and "Sign in" links and
we’ve shown the "Signed in as…" message on the right hand side of the navbar,
when there is a user signed in.
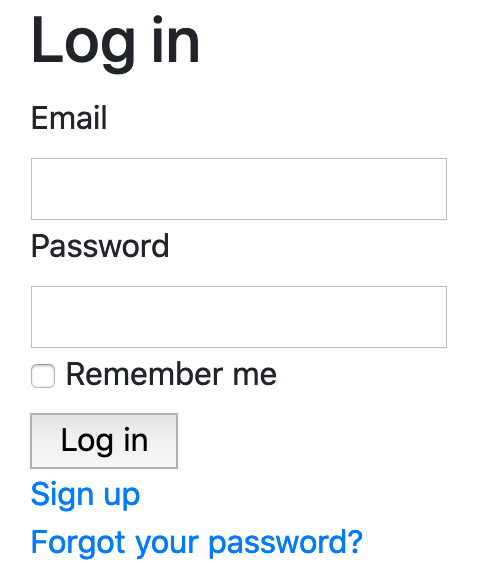
The navbar will now look like this when a user is signed in:
Let’s run our test again with bundle exec rspec spec/features/signing_in_spec.rb.
This time it will pass:
1 example, 0 failures
Excellent! This is the sign in part of this section done, now let’s add the sign out part of this task.
Adding sign out
Before we write any code to build this sign out functionality, let’s write a test for this using the code from the following listing:
require "rails_helper"

RSpec.feature "Signed-in users can sign out" do
  let!(:user) { FactoryBot.create(:user) }

  before do
    login_as(user)
  end

  scenario do
    visit "/"
    click_link "Sign out"
    expect(page).to have_content "Signed out successfully."
  end
end
This test is a fairly simple one that re-uses a bit of code from our sign in
feature, but with a subtle twist. There is now a login_as call in before
block. This login_as method doesn’t come from Devise, but rather a gem
Devise uses called Warden. Warden provides the user session management,
whereas Devise provides the pretty face for it all. The login_as method will
log in a user without us having to walk through the whole sign in process
ourselves.
When we’re done with this feature, we’ll have a sign out link in our application that looks like this:
The login_as method isn’t defined for our tests yet though, as we’ll see if
we try to run this test with rspec spec/features/signing_out_spec.rb:
1) Signed-in users can sign out
   Failure/Error: login_as(user)
   NoMethodError:
     undefined method `login_as' for #<RSpec::ExampleGroups::SignedIn...
This method isn’t included automatically by Warden, so we will need to include
the module that defines it manually. We can do this in spec/rails_helper.rb,
the file that defines all of the configuration for our Rails tests, by putting
this code at the bottom of the RSpec.configure block:
RSpec.configure do |config|
  ...
  config.include Warden::Test::Helpers, type: :feature
  config.after(type: :feature) { Warden.test_reset! }
end
The include method will include the specified module into our tests, and the
type option passed to it will make it so that this module is only included
into tests which reside in spec/features. We also need to tell Warden to
reset itself after each test, which is done with the second line.
With those lines now in place, when we run our test it will complain that it can’t find the "Sign out" link:
1) Signed-in users can sign out
   Failure/Error: click_link "Sign out"
   Capybara::ElementNotFound:
     Unable to find link "Sign out"
Let’s add this link next to the "Signed in as …" message in
app/views/layouts/application.html.erb:
<% if user_signed_in? %>
Signed in as <%= current_user.email %> ·
<%= link_to "Sign out",
destroy_user_session_path,
data: { "turbo-method": :delete }
%>
<% end %>This will now make our navbar look like this:
When we run our test again with bundle exec rspec spec/features/signing_out_spec.rb,
we can see that Devise has — for the third time in a row — taken care of the
hard work. All we needed to provide was the link and now our test passes:
1 example, 0 failures
Great to see. Let’s run all of our tests now with bundle exec rspec, and see if
they’re all working:
17 examples, 0 failures
Yes, good! They are all indeed working. Let’s commit this:
$ git add .
$ git commit -m "Add sign in and sign out"
$ git push
With this section we’ve implemented sign in and sign out for our application to complement the sign up feature that we added just before. You now have a taste of what Devise can do for you. Go and play around with in the application now. Trying signing up, signing in and signing out.
You may notice during these experiments that the sign up and sign in forms aren’t styled as neatly as our project and ticket forms.
This is because Devise provides basic views that don’t use Tailwind styling. Our next task will be to fix up these views.
Styling the Devise views
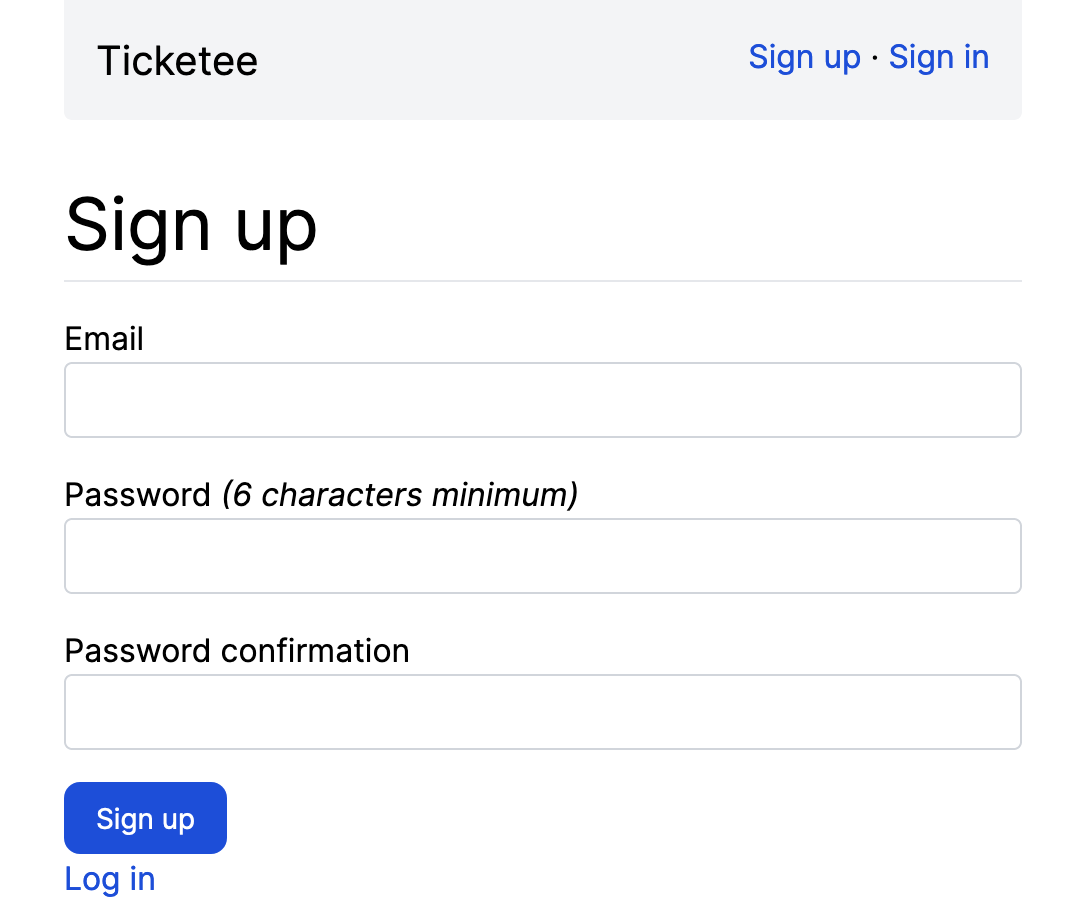
Devise is an engine, and this means that its controllers and views live inside the gem, rather than inside our application. The devise gem’s views don’t know that we spent all of the last chapter applying styles to our application. So as a result, they look a bit plain. Here’s the sign up page, for example:
As this is going to be a well-trafficked page of our application, we should make it look better! But how do we get access to the views that are inside the gem? Well, we can copy them out. Thankfully Devise
provides a method for us to do this by way of its devise:views generator.
Let’s run this in our application now:
$ rails g devise:views
This command copies over all of Devise’s views to our application’s
app/views directory, inside another directory called app/views/devise. This won’t immediately fix the views, but it will provide us a good kicking-off point to do so.
There’s only a couple of small changes we’ll make:
-
Adding the
headerwrapper tag to make the heading consistent, and; -
Changing the form to use the Tailwind classes that we worked on in the last chapter
The view for this page is located at app/views/devise/registrations/new.html.erb
so open it up and have a look. We can replace the old heading in this view:
<h2>Sign up</h2>With a new one that matches the style of our application:
<header class="header">
  <h1>Sign up</h1>
</header>
We’ll change the form_for:
<%= form_for(resource, ...To use the form class:
<%= form_for(resource, as: resource_name, url: registration_path(resource_name), html: { class: "form" }) do |f| %>
  ...
The header will take effect, but the changes to our form itself will not:
The forms labels are styled, but the inputs are not. This is happening becuase in app/assets/stylesheets/application.tailwind.css, we are only applying the .input style to input[type=text] and textarea elements:
.form input[type=text],
.form textarea {
  @apply input;
}
Let’s expand the selectors here for this rule to include the two additional input types that are included on this form: email and password:
.form input[type=text],
.form input[type=email],
.form input[type=password],
.form textarea {
@apply input;
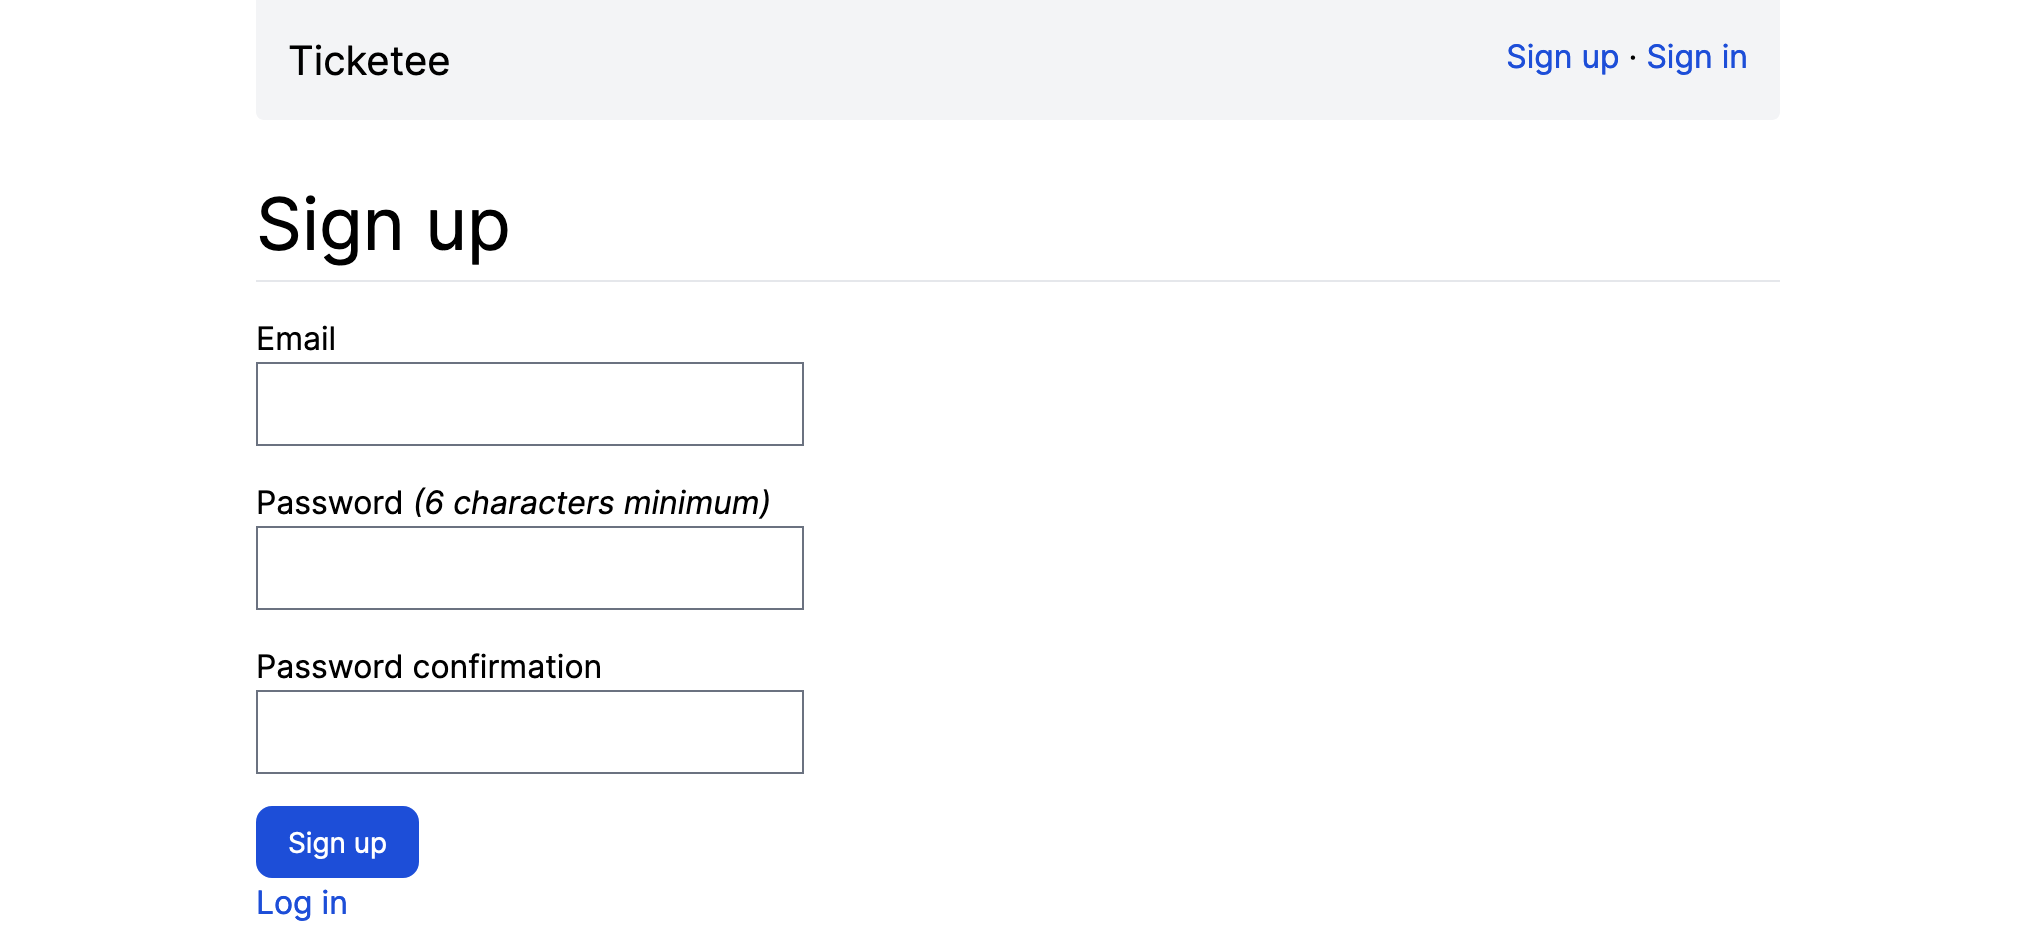
}By adding these two rules, or new signup page
These actions will turn the page into this:
We’ll also need to make this same changes to the view for the sign in page, which is in
app/views/devise/sessions/new.html.erb. While you’re here it would be nice to
change the words "Log in" to "Sign in" as well, to keep it consistent with the
link we put in the top navigation.
<header class="header">
  <h1>Sign In</h1>
</header>
And we’ll change the form itself:
<%= form_for(resource, as: resource_name, url: session_path(resource_name), html: { class: "form"}) do |f| %>

<% end %>
And that’s it. We’ll run our tests with bundle exec rspec to make sure we haven’t
broken anything…
17 examples, 0 failures
All good! Now the design for our sign up and sign in forms is more consistent with the rest of our application.
Our sign in page will now look like this:
Let’s make a commit for this change:
$ git add .
$ git commit -m "Styled sign up and sign in forms"
$ git push
You can go through and style the other views that Devise provides similarly if you feel like. This book doesn’t go through that whole process in order to keep this section short.
Now that we have users in our application, let’s put them to use.
Linking tickets to users
Currently when a user creates a ticket in the application, there is no way to tell after the fact which user created that ticket. We are going to fix up this little problem with our application as the last part of this chapter.
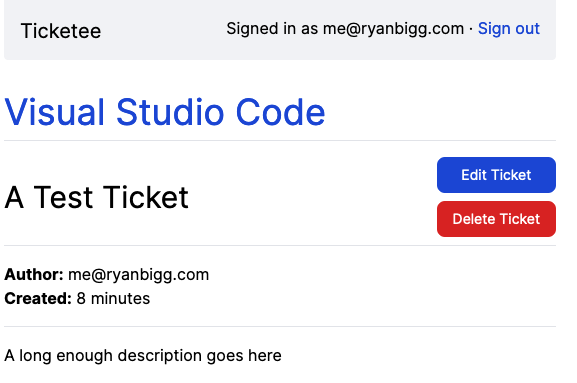
When we’re done, a ticket will clearly indicate who created it:
Rather than creating a new feature, we’ll be adding to a previous feature:
spec/features/creating_tickets_spec.rb. In the very first scenario for that
feature, we’ll add few lines to assert that we can see that the current user
is the author of the ticket:
scenario "with valid attributes" do
  fill_in "Name", with: "Non-standards compliance"
  fill_in "Description", with: "My pages are ugly!"
  click_button "Create Ticket"

  expect(page).to have_content "Ticket has been created."
  expect(page).to have_content "Author: #{user.email}"
end
The user variable that we use in this new code doesn’t exist yet. Let’s
add a let at the top of this feature. We’ll also need to sign in as this user
using the login_as helper from Warden, which we can do by adding this code to
the top of the before block in this
feature:
RSpec.feature "Users can create new tickets" do
  let(:user) { FactoryBot.create(:user) }

  before do
    login_as(user)
    ...
Now our new code is set up and ready to go. Let’s give it a whirl by running
bundle exec rspec spec/features/creating_tickets_spec.rb. The first thing we’ll notice
is that the content we expect to be present on the page, is not:
1) Users can create new tickets with valid attributes
   Failure/Error: expect(page).to have_content "Author: #{user.email}"
     expected to find text "Author: test1@example.com" in "Internet
     Explorer Non-standards compliance Edit Ticket Delete Ticket My..."
To fix this error, let’s add this element to the code within
app/views/tickets/show.html.erb, underneath the header with the ticket title and the ticket’s edit and delete actions.
<table class='attributes'>
  <tr>
    <th>Author:</th>
    <td><%= @ticket.author.email %></td>
  </tr>
  <tr>
    <th>Created:</th>
    <td><%= time_ago_in_words(@ticket.created_at) %> ago</td>
  </tr>
</table>

<hr>
We can sense that our Ticket object will have many attributes added to it
over the course of the book, so we’re leaving room for expansion by creating a
table that we can add extra rows to.
With this code we’re calling an author method on our @ticket object. The
author method will return the user who created the ticket, and email will
show us the email address for that user.
(We’re also using a view helper called time_ago_in_words
[5],
that will present the timestamp that the ticket was created at, in a nice
readable format, such as "about 3 minutes" or "about 2 hours". Just a little
nicety.)
The author association isn’t defined on our Ticket model yet, but we can add
that with a single line of code underneath the belongs_to :project line in
app/models/ticket.rb:
class Ticket < ActiveRecord::Base
  belongs_to :project
  belongs_to :author, class_name: "User"
  ...
Here we’re defining a new association called author on our Ticket
instances. By default, the association name of :author assumes that our class
is named Author - since we don’t have a model called Author and the model is
instead called User, we need to tell the association that. We do that with
the class_name option.
With a new belongs_to association comes the necessity to add a new field to
our tickets table to track the id of the authors of our tickets. Let’s do
that now by running this command:
$ rails g migration add_author_to_tickets author:references
This migration will add the author_id to our tickets table by using this code:
class AddAuthorToTickets < ActiveRecord::Migration[7.0]
  def change
    add_reference :tickets, :author, null: false, foreign_key: true
  end
end
There’s just one small change we have to make to this code before we can run it. Rails assumes that we want to add a foreign key constraint to our association, which we do - but we don’t want it how it will behave out of the box.
We need to remove the foreign_key: true part of the add_reference line, and
add a foreign key constraint separately, so our migration should look like this.
We also need to remove the null: false part of the add_reference line as this
will mean our existing items need to have an author_id set and they do not. We would
need to create a data migration to add this data to our previously created tickets and
assign them to a user.
class AddAuthorToTickets < ActiveRecord::Migration[7.0]
  def change
    add_reference :tickets, :author, null: false, foreign_key: { to_table: :users }
  end
end
Why do we need to do this? Because Rails' automatic inference will try to apply
a foreign key on our tickets table, pointing to an authors table - and we
don’t have an authors table. Our author will be a User, living in the users
table, so we need to specifically tell Rails that the foreign key should point
to the users table instead (but still use the author_id field to do so.)
|
If we left the line about foreign keys as-is, without changing it, it would still work in this scenario, as long as we’re using SQLite. Rails doesn’t support foreign keys natively in SQLite, only in PostgreSQL and MySQL, so this would work just fine, it just wouldn’t do anything. We’d run into big problems down the track when it comes to using alternative database systems, like we do in Chapter 13 when we look at using PostgreSQL on Heroku. So it’s best to fix it up now, to prevent problems later on. |
We can now run the migration, to add the author_id field to our tickets table.
$ rails db:migrate
Let’s see if our feature has gotten any further by running it again, with
bundle exec rspec spec/features/creating_tickets_spec.rb.
1) Users can create new tickets with valid attributes
     Failure/Error: expect(page).to have_content "Ticket has been created."
       expected to find text "Ticket has been created." in "Signed in as test1@example.com\nSign out\nTicket has not been created.\nNew Ticket Internet Explorer\n1 error prohibited this project from being saved:\nAuthor must exist\nName\nDescription"
     # ./spec/features/creating_tickets_spec.rb:19:in...
This is error happening because because we’re not
actually linking users to the tickets that they create yet. In order to remedy
this, we’ll need to do that actual linking, and the best place for that
linking is in the controller action where tickets are created: the create
action of TicketsController.
After we build a ticket in this action, let’s also set the ticket’s author. We
can do this adding the author assignment to the create action
for TicketsController:
def create
  @ticket = @project.tickets.build(ticket_params)
  @ticket.author = current_user

  if @ticket.save
    ...
By associating an author to the @ticket object here directly before the
save, we’re linking the current_user to the ticket. Once the ticket has been
saved, that Ticket instance and that User instance will be tied together
forever in a ticket-author relationship.
|
A naive, but unfortunately common, way to associate tickets to users would be to
create a hidden field for Manually setting the author in the controller is much safer - there’s no way for the user to fake this data if they’re logged in. They can only ever assign the tickets to themselves. |
Let’s see if our test gets any further by running it again with bundle exec rspec
spec/features/creating_tickets_spec.rb. It should now pass:
3 examples, 0 failures
Great! We are now showing a ticket’s author on the ticket page itself.
Let’s run all our tests with bundle exec rspec
and confirm that we haven’t broken anything.
17 examples, 4 failures

Failed examples:

rspec ./spec/features/deleting_tickets_spec.rb:11
rspec ./spec/features/editing_tickets_spec.rb:12
rspec ./spec/features/editing_tickets_spec.rb:24
rspec ./spec/features/viewing_tickets_spec.rb:17
Oops, it appears we’ve broken some of our features! Fortunately they all fail for the same reason:
1) Users can delete tickets successfully
     Failure/Error: let(:ticket)  { FactoryBot.create(:ticket, project: project) }

     ActiveRecord::RecordInvalid:
       Validation failed: Author must exist
     # ./spec/features/deleting_tickets_spec.rb:5...
They’re all failing because the tickets created by FactoryBot in the features don’t link to an author. When the ticket is created, rails raises a validation error that it can’t find the author and so it raises this error.
Let’s see about fixing them up.
Fixing the failing features
These features are all failing for the same reason: when we create a ticket using our ticket factory, an author is not set. This author association is now required by the Ticket model — all tickets must have authors. Our factory is attempting to create a ticket without an ayuthor.
We can fix this by adding an association method call to our factory in spec/factories/tickets.rb:
FactoryBot.define do
  factory :ticket do
    name { "Example ticket" }
    description { "An example ticket, nothing more" }
    association :author, factory: :user
  end
end
This line will automatically use the user factory to create an author for the ticket. If we wanted to override the setting of our factory for the author attribute, we could set it manually, the same as any other attribute:
a_different_user = FactoryBot.create(:user, email: "different@example.com")
FactoryBot.create(:ticket, author: a_different_user)
This change will be enough to get our tests passing, which we’ll see by running bundle exec rspec:
17 examples, 0 failures
Excellent. Let’s go ahead and make a commit for all this now:
$ git add .
$ git commit -m "Link tickets and users upon ticket creation"
$ git push
That wraps up the last section of this chapter.
Summary
This chapter covered how to set up authentication so that users can sign up and sign in to your application to accomplish certain tasks. You learnt about a very popular gem used to handle authentication named Devise, and you also verified the functionality it provides by writing Capybara features to go with it.
Then came linking tickets to users, so you can track which user created which
ticket. You did this by using the setter method provided by the belongs_to
method’s presence on the Ticket class.
We encourage you to start up the application with rails server, visit
http://localhost:3000, and play around, to get an idea of how it’s looking
right now. The application is taking shape and currently offers a lot of
functionality for the not-much work we’ve put in so far.
In the next chapter, we’ll look at restricting certain actions to only users who are signed in or who have a special attribute set on them.