Oh, CRUD!
In chapter 3, you began writing stories for a CRUD (create, read, update,
delete) interface for your Project resource. Here you continue in that
vein, beginning with writing a story for the r part of CRUD:
reading. We often refer to reading as viewing in this
and future chapters—we mean the same thing, but sometimes viewing is a better word.
For the remainder of the chapter, you’ll round out the CRUD interface for projects, providing your users with ways to edit, update, and delete projects too. Best of all, you’ll do this using behavior-driven development (BDD) the whole way through, continuing your use of the RSpec and Capybara gems that we saw in use in the last chapter. This chapter’s length is testament to exactly how quickly you can get some CRUD actions up and running on a resource with Ruby on Rails.
Also in this chapter, you’ll see a way to create test data extremely
easily for your tests, using a gem called factory_bot, as well as a way to
make standard controllers a lot neater.
Viewing projects
The show action generated for the story in chapter 3 was only half of this
part of CRUD. The other part is the index action, which is responsible for
showing a list of all of the projects. From this list, you can navigate to the show
action for a particular project. The next story is about adding functionality
to allow you to do that.
Create a new file in the features directory called
spec/features/viewing_projects_spec.rb, shown in the following listing.
require "rails_helper"

RSpec.feature "Users can view projects" do
  scenario "with the project details" do
    project = FactoryBot.create(:project, name: "Visual Studio Code")

    visit "/"
    click_link "Visual Studio Code"
    expect(page.current_url).to eq project_url(project)
  end
end
To run this single test, you can use bundle exec rspec
spec/features/viewing_projects_spec.rb. When you do this, you’ll see the
following failure:
1) Users can view projects with the project details
   Failure/Error: project = FactoryBot.create(:project,
   name: "Visual Studio Code")
   NameError:
     uninitialized constant FactoryBot
The FactoryBot constant is defined by another gem: the factory_bot gem.
Introducing Factory Bot
The factory_bot gem, created by thoughtbot (http://thoughtbot.com),
provides an easy way to use factories to create new objects for your tests.
Factories define a bunch of default values for an object, allowing you to
easily craft example objects you can use in your tests.
Before you can use this gem, you need to add it to the :test group in your Gemfile.
Now the entire group looks like this:
group :test do
  gem "capybara"
  gem "factory_bot_rails", "~> 6.2"
end
To install the gem, run bundle. With the factory_bot_rails gem installed, the
FactoryBot constant is now defined. Run bundle exec rspec
spec/features/viewing_projects_spec.rb
again, and you’ll see a new error:
1) Users can view projects with the project details
   Failure/Error: project = FactoryBot.create(:project,
   name: "Visual Studio Code")
   ArgumentError:
     Factory not registered: project
When using Factory Bot, you must create a factory for each model you wish to
use the gem with. If a factory isn’t registered with Factory Bot, you’ll get the previous error. To register/create a factory, create a new directory in the spec directory called factories, and then in that directory create a new file called projects.rb. Fill that file with the content from the following
listing.
FactoryBot.define do
  factory :project do
    name { "Example project" }
  end
end
When you define the factory in this file, you give it a name attribute, so that every
new project generated by the factory via FactoryBot.create :project will have the
name "Example project". The name: "Visual Studio Code" part of this method call in
spec/features/viewing_projects_spec.rb changes the name for that instance to the one
passed in. You use factories here because you don’t need to be concerned about
any other attribute on the Project object. If you weren’t using
factories, you’d just create the project the way you would anywhere else, like in the console:
Project.create(name: "Visual Studio Code")Although this code is about the same length as its FactoryBot.create
variant, it isn’t future proof. If you were to add another field to the
projects table and add a validation (say, a presence one) for that field,
you’d have to change all occurrences of the create method in your tests to contain this
new field. Over time, as your Project model gets more and more attributes, the
actual information that you care about — in this case, the name — would get lost
in amongst all of the unrelated data. When you use a factory, you can change it in one place: where the
factory is defined. If you cared about what that field was set to, you could
modify it by passing it as one of the key-value pairs in the Factory call.
That’s a lot of theory—how about some practice? Let’s see what happens
when you run bundle exec rspec spec/features/viewing_projects_spec.rb
again:
1) Users can view projects with the project details
   Failure/Error: click_link "Visual Studio Code"
   Capybara::ElementNotFound:
     Unable to find link "Visual Studio Code"
A link appears to be missing. You’ll add that right now.
Adding a link to a project
Capybara is expecting a link on the page with the words "Visual Studio Code", but
can’t find it. The page in question is the homepage, which is the index
action from your ProjectsController. Capybara can’t find it because you
haven’t yet put it there, which is what you’ll do now. Open
app/views/projects/index.html.erb and change the contents to the following:
<h1>Projects</h1>

<%= link_to "New Project", new_project_path %>

<div class="projects">
  <% @projects.each do |project| %>
    <h2><%= link_to project.name, project %></h2>
    <p><%= project.description %></p>
  <% end %>
</div>
We’ve added a heading, and some details on each of the projects. If you run the spec again, you get this error, which isn’t helpful at first glance:
1) Users can view projects with the project details
   Failure/Error: visit "/"
   ActionView::Template::Error:
     undefined method `each' for nil:NilClass
   # ./app/views/projects/index.html.erb:6:in ...
This error points at line 6 of your app/views/projects/index.html.erb file,
which reads <% @projects.each do |project| %>.
From this you can determine that the error must have something to do with the
@projects variable. This variable hasn’t yet been defined, and as mentioned in Chapter
3, instance variables in Ruby return nil rather than raise an exception. So because
@projects is nil, and there’s no each method on nil, you get this error
undefined method 'each' for nil:NilClass.
Watch out for this in Ruby—as you can see here, it can
sting you hard.
We need to define this variable in the index action of our controller. Open
ProjectsController at
app/controllers/projects_controller.rb, and change the index method
definition to look like this.
index action of ProjectsController
def index
  @projects = Project.all
end
By calling all on the Project model, you retrieve all the records from the
database as Project objects, and they’re available as an enumerable Array-like
object. Now that you’ve put all the pieces in place, you can run the feature
with bundle exec rspec spec/features/viewing_projects_spec.rb, and it should
pass:
1 example, 0 failures
The spec now passes. Is everything else still working, though? You can check
by running bundle exec rspec. Rather than just running the one test, this code runs
all the tests in the spec directory. When you run the code, you should see
this:
3 examples, 0 failures
All the specs are passing, meaning all the functionality you’ve written so far is working as it should. Commit your changes and push them to GitHub, using these commands:
$ git add .
$ git commit -m "Add the ability to view a list of all projects"
$ git push
The reading part of this CRUD resource is done! You’ve got the index and
show actions for the ProjectsController behaving as they should. Now you
can move on to updating.
Editing projects
With the first two parts of CRUD (creating and reading) done, you’re ready
for the third part: updating. Updating is similar to creating and reading in that it has two
actions for each part (creation has new and create; reading has index and
show). The two actions for updating are edit and update. Let’s begin by
writing a feature and creating the edit action.
The edit action
As with the form used for creating new projects, you want a form that
allows users to edit the information of a project that already exists. You first put an "Edit
Project" link on the show page, that takes users to the edit action
where they can edit the project. Write the code from the following listing into
spec/features/editing_projects_spec.rb.
require "rails_helper"

RSpec.feature "Users can edit existing projects" do
  scenario "with valid attributes" do
    FactoryBot.create(:project, name: "Visual Studio Code")

    visit "/"
    click_link "Visual Studio Code"
    click_link "Edit Project"
    fill_in "Name", with: "VS Code"
    click_button "Update Project"

    expect(page).to have_content "Project has been updated."
    expect(page).to have_content "VS Code"
  end
end
If you remember, FactoryBot#create builds you an entire object and lets you
tweak the defaults. In this case, you’re changing the name.
Also, it’s common for tests to take this overall form: arrange, act, assert. (This is also referred to as 'given', 'when', and 'then', to describe the actions that take place in each section.) That’s why the whitespace is there: it clearly splits the test. Your tests won’t always look like this, but it’s good form.
After writing this story, again use the rspec command to run just this one
feature: bundle exec rspec spec/features/editing_projects_spec.rb. The first
couple of lines for this scenario pass because of the work you’ve already
done, but it fails on the line that attempts to find the "Edit Project" link:
1) Users can edit existing projects with valid attributes
   Failure/Error: click_link "Edit Project"
   Capybara::ElementNotFound:
     Unable to find link "Edit Project"
To add this link, open app/views/projects/show.html.erb and add the link
under the heading for the project name:
<h1><%= @project.name %></h1>

<%= link_to "Edit Project", edit_project_path(@project) %>
The edit_project_path method generates a link pointing towards the edit
action of the ProjectsController. This method is provided
to you because of the resources :projects line in config/routes.rb.
If you run bundle exec rspec spec/features/editing_projects_spec.rb again, it now
complains about the missing edit action:
1) Users can edit existing projects with valid attributes
   Failure/Error: click_link "Edit Project"
   AbstractController::ActionNotFound:
     The action 'edit' could not be found for ProjectsController
Define this action in your ProjectsController,
under the show action (but above the private line), as in the following listing.
def edit
  @project = Project.find(params[:id])
end
As you can see, this action works in a fashion identical to the show action,
where the ID for the resource is automatically passed as params[:id]. Let’s
work on DRYing[1] this up once you’re done with this controller. When you run the
spec again, you’re told that the edit view is missing:
1) Users can edit existing projects with valid attributes
  Failure/Error: click_link "Edit Project"

  ActionController::MissingExactTemplate:
    ProjectsController#edit is missing a template for request formats: text/html
It looks like you need to create this template. The edit action’s form is
similar to the form in the new action. If only there were a way to extract
out just the form into its own template. Well, in Rails, there is! You can
extract out the form from app/views/projects/new.html.erb into what’s called a
partial. We saw these briefly in Chapter 1.
A partial is a template that contains some code that can be shared between
other templates. To extract the form from the new template into a new partial,
take this code out of app/views/projects/new.html.erb:
<%= form_with(model: @project) do |form| %>
  <% if @project.errors.any? %>
  <div id="error_explanation">
    <h2><%= pluralize(@project.errors.count, "error") %>
    prohibited this project from being saved:</h2>

    <ul>
      <% @project.errors.full_messages.each do |msg| %>
        <li><%= msg %></li>
      <% end %>
    </ul>
  </div>
  <% end %>
  <div>
    <%= form.label :name %>
    <%= form.text_field :name %>
  </duv>

  <div>
    <%= form.label :description %>
    <%= form.text_field :description %>
  </div>

  <%= form.submit %>
<% end %>
This will leave the new template looking pretty bare, with just the heading.
Then create a new file called app/views/projects/_form.html.erb and put into
it the code you just extracted from the new template. While moving it, you
should also change all instances of @project to be project instead.
<%= form_with(model: project) do |form| %>
  <% if project.errors.any? %>
  <div id="error_explanation">
    <h2><%= pluralize(project.errors.count, "error") %>
    prohibited this project from being saved:</h2>

    <ul>
      <% project.errors.full_messages.each do |msg| %>
        <li><%= msg %></li>
      <% end %>
    </ul>
  </div>
  <% end %>
  <div>
    <%= form.label :name %>
    <%= form.text_field :name %>
  </div>

  <div>
    <%= form.label :description %>
    <%= form.text_area :description %>
  </div>

  <%= form.submit %>
<% end %>|
The filenames of partials must always start with an underscore, which is why
we’ve written |
Why have we done this variable renaming? Because to be reusable, partial views
shouldn’t rely on instance variables - they should be totally self-sufficient.
When we render the partial from our main view, we can pass in the data that
the partial needs to render - in this case, we’ll pass in the @project
variable from the new template, which means it will be accessible as a local
variable from within the partial.
To render the partial and pass in the @project instance, modify your new
template in app/views/projects/new.html.erb and add this line where the form
previously was:
<%= render "form", project: @project %>This will leave your new template very slim indeed:
new template<h1>New Project</h1>
<%= render "form", project: @project %>|
This is an example of a refactoring - changing the internals of code
without affecting functionality. You can confirm that this refactoring has
not affected the ability to create projects, by running the test for it -
|
Now you need to create the edit
action’s template. Create a new file at app/views/projects/edit.html.erb with this content.
<h1>Edit Project</h1>
<%= render "form", project: @project %>
When you pass a string to the render method, Rails looks up a partial in the
same directory as the current template matching the string and renders that
instead. Using the partial, the next line passes without any further
intervention from you when you run bundle exec rspec
spec/features/editing_projects_spec.rb.
1) Users can edit existing projects with valid attributes
   Failure/Error: click_button "Update Project"
   AbstractController::ActionNotFound:
     The action 'update' could not be found for ProjectsController
The test has filled in the "Name" field successfully; but it fails when the
"Update Project" button is clicked, because it can’t find the update action in
the ProjectsController. To make this work, you’ll need to create that
update action.
The update action
As the following listing shows, you can now define update under the edit action in your controller. Make sure to do this above the private keyword too!
def update
  @project = Project.find(params[:id])
  @project.update(project_params)

  flash[:notice] = "Project has been updated."
  redirect_to @project
end
Notice the new method on @project here, update. It
takes a hash of attributes identical to the ones passed to new or create,
updates those specified attributes on the object, and then saves them to the
database if they’re valid. This method, like save, returns true if the
update is valid or false if it isn’t.
Now that you’ve implemented the update action,
let’s see how the test is going by running bundle exec rspec spec/features/editing_projects_spec.rb:
1 example, 0 failures
That was easy! But what happens if somebody fills in the "Name" field with a blank value? The user
should receive an error, just as in the create action, due to the validation in the
Project model. You should write a test to verify this behaviour.
Move the first
four steps from the first scenario in spec/features/editing_projects_spec.rb
into a before block, because when a user is editing a project, the first
four steps will always be the same: a project needs to exist, and then a user
goes to the homepage, finds a project, and clicks "Edit Project". Change
spec/features/editing_projects_spec.rb so it looks like this.
require "rails_helper"

RSpec.feature "Users can edit existing projects" do
  before do
    FactoryBot.create(:project, name: "Visual Studio Code")

    visit "/"
    click_link "Visual Studio Code"
    click_link "Edit Project"
  end

  scenario "with valid attributes" do
    fill_in "Name", with: "Visual Studio Code Nightly"
    click_button "Update Project"

    expect(page).to have_content "Project has been updated."
    expect(page).to have_content "Visual Studio Code Nightly"
  end
end
A before block can help set up state for multiple tests: the block runs
before each test executes. Sometimes, setting up is more than just creating
objects; interacting with an
application is totally legitimate as part of setup.
Defining behaviour for when an update fails
Now you can add a new scenario, shown in the following listing, to test
that the user is shown an error message for when the validations fail during
the update action. Add this new scenario directly under the one currently
in this file.
scenario "when providing invalid attributes" do
  fill_in "Name", with: ""
  click_button "Update Project"

  expect(page).to have_content "Project has not been updated."
end
When you run bundle exec rspec
spec/features/editing_projects_spec.rb, filling in "Name" works, but when the form is
submitted, the test doesn’t see the "Project has not been updated." message:
1) Users can edit existing projects when providing invalid attributes
   Failure/Error: expect(page).to have_content "Project has not been
   updated."
     expected to find text "Project has not been updated." in "Project
     has been updated. Visual Studio Code Edit Project"
The test can’t find the message on the page because you haven’t written any
code to test for what to do if the project being updated is now invalid. In
your controller, use the code in the following listing for the update action
so that it shows the error message if the update method returns false.
update action of ProjectsController
def update
  @project = Project.find(params[:id])

  if @project.update(project_params)
    flash[:notice] = "Project has been updated."
    redirect_to @project
  else
    flash.now[:alert] = "Project has not been updated."
    render "edit"
  end
end
And now you can see that the feature passes when you rerun bundle exec rspec
spec/features/editing_projects_spec.rb:
2 examples, 0 failures
Again, you should ensure that everything else is still working by running
bundle exec rspec. You should see this summary:
5 examples, 0 failures
Looks like a great spot to make a commit and push:
$ git add .
$ git commit -m "Projects can now be updated"
$ git push
The third part of CRUD, updating, is done now. The fourth and final part is deleting.
Deleting projects
We’ve reached the final stage of CRUD: deletion. This involves implementing
the final action of your controller: the destroy action, which allows you to
delete projects.
Of course, you’ll need a feature to get going: a "Delete Project" link on the
show page that, when clicked, prompts the user for
confirmation that they really want to delete the project.[2]
Put the feature at spec/features/deleting_projects_spec.rb using the code in
the following listing.
require "rails_helper"

RSpec.feature "Users can delete projects" do
  scenario "successfully" do
    FactoryBot.create(:project, name: "Visual Studio Code")

    visit "/"
    click_link "Visual Studio Code"
    click_button "Delete Project"

    expect(page).to have_content "Project has been deleted."
    expect(page.current_url).to eq projects_url
    expect(page).to have_no_content "Visual Studio Code"
  end
end
When you run this test using bundle exec rspec
spec/features/deleting_projects_spec.rb, the first couple of lines pass
because they’re just creating a project using Factory Bot, visiting the
homepage, and then clicking the link to go to the project page. The fourth
line in this scenario fails, however, with this message:
1) Users can delete projects successfully
Failure/Error: click_button "Delete Project"
Capybara::ElementNotFound:
Unable to find button "Delete Project"
To get this to work, you need to add a "Delete Project" button to the show
action’s template, app/views/projects/show.html.erb. Put it on the line
after the "Edit Project" link, using this code:
<%= button_to "Delete Project",
project_path(@project),
method: :delete,
form: { data: { turbo_confirm: 'Are you sure?' } }
%>|
"Turbo" confirm vs regular confirm
Rails 7 includes a framework called "Turbo" that accelerates page loads and transitions. In order to make this confirmation box work within this new Turbo-powered Rails world, we need to use However, this will not show the "Are you sure?" confirmation message on newer Rails applications. We include that small example here as just one representation of how Rails has evolved over time. If there are big differences like this further on in the book, we’ll call them out in a similar way simply because there’s no guarantee that every Rails application you’ll work on is using the latest and greatest that Rails can offer. |
Here you pass two new options to the button_to method: :method and :data.
The :method option tells Rails what HTTP method
this link should be using, and here’s where you specify the :delete method.
In the previous chapter, the four HTTP methods were mentioned; the final one
is DELETE. When you developed your first application, chapter 1 explained
why you use the DELETE method, but let’s review the reasons.
If all actions are available by GET requests, then anybody can create a URL that directly
corresponds to the destroy action of your controller. If they send you the
link, and you click it, then it’s bye-bye precious data. By using DELETE, you
protect an important route for your
controller by ensuring that you have to follow the correct link from your
site, to make the proper request to delete this resource.
The :data option containing a
:confirm key brings up a prompt, using JavaScript, that asks users if
they’re sure that’s what they want to do. If you launch a
browser and follow the steps in the feature to get to this "Delete Project"
button, and then you click the button, you see the confirmation prompt. This
prompt is exceptionally helpful for preventing accidental deletions.
Because Capybara doesn’t support JavaScript by default, the prompt is ignored, so you don’t have to tell Capybara to click "OK" in response to the prompt—there is no prompt, because Rails has a built-in fallback for users without JavaScript enabled.
When you run the spec again with bundle exec rspec spec/features/deleting_projects_spec.rb,
it complains of a missing destroy action:
1) Users can delete projects successfully
Failure/Error: click_button "Delete Project"
AbstractController::ActionNotFound:
The action 'destroy' could not be found for ProjectsController
This is the final action you need to implement in your controller; it goes
under the update action. The action is shown in the
following listing.
destroy action from ProjectsController
def destroy
@project = Project.find(params[:id])
@project.destroy
flash[:notice] = "Project has been deleted."
redirect_to projects_path
eHere you call the destroy method on the @project object you get back from
your find call. No validations are run, so no conditional setup is needed.
Once you call destroy on that object, the relevant database record is gone
for good; but the Ruby object representation of this record still exists until
the end of the request. After the record has been deleted from the database,
you set the flash[:notice] to indicate to the user that their action was
successful, and redirect back to the projects index page by using the
projects_path routing helper in combination with redirect_to.
With this last action in place, your newest feature should pass when you run
bundle exec rspec spec/features/deleting_projects_spec.rb:
1 example, 0 failures
Let’s see if everything else is still passing, with bundle exec rspec:
6 examples, 0 failures
Great! Let’s commit that:
$ git add .
$ git commit -m "Projects can now be deleted"
$ git push
Done! Now you have full support for CRUD operations in your ProjectsController.
Let’s refine this controller into simpler code before we move on.
What happens when things can’t be found
People sometimes poke around an application looking for things that are no
longer there, or they muck about with the URL. As an example, launch your application’s server
by using rails server, and try to navigate to
http://localhost:3000/projects/not-here. You’ll see the exception shown here:
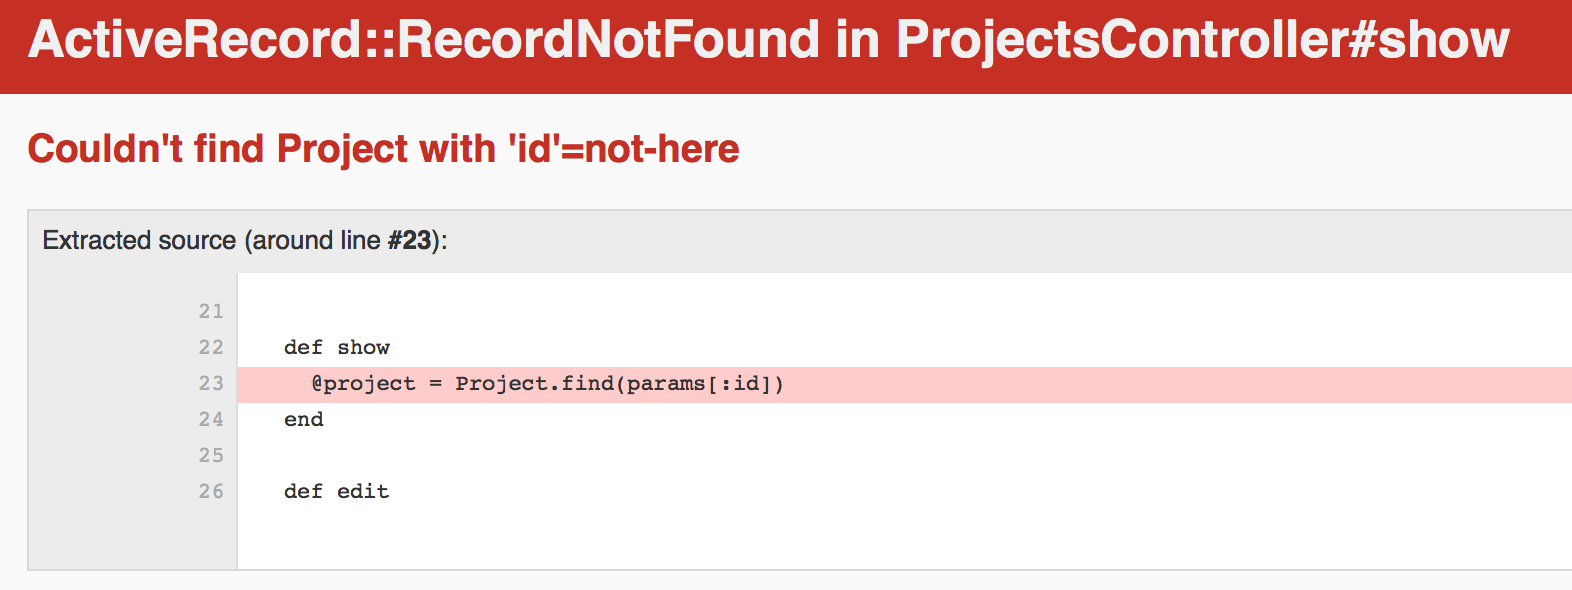
ActiveRecord::RecordNotFound exceptionThis is Rails' way of displaying exceptions in development mode. Under this error, more information is
displayed, such as the backtrace of the error. Rails will only do this in the development
environment because of the consider_all_requests_local
configuration setting in config/environments/development.rb. This file contains all the custom
settings for your development environment, and the consider_all_requests_local setting is true by
default. This means Rails will show the complete exception information when it runs in the
development environment. When this application is running under the production environment, users would instead see this:
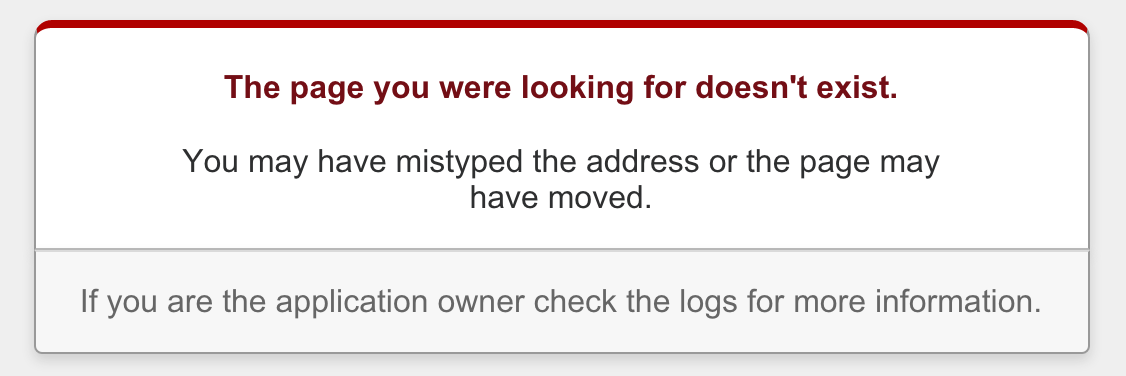
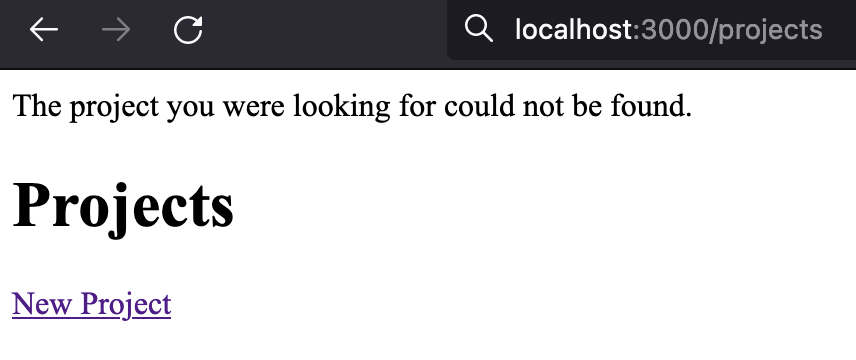
This is not ideal! What we would rather see is a message that the project cannot be found.
Handling the ActiveRecord::RecordNotFound exception
To handle the ActiveRecord::RecordNotFound exception, you can rescue it and, rather
than letting Rails render a 404 page, redirect the user to the index action
with an error message. To test that users are shown an error message rather
than a "Page does not exist" error, you’ll write an RSpec request test
instead of a feature test, because viewing projects that aren’t there is
something a user can do, but not something that should happen over the course
of a normal browsing session. Plus, it’s easier.
The file for this request test,
spec/requests/projects_request_spec.rb, was automatically generated when
you ran the controller generator, because you have the rspec-rails gem in your
Gemfile.[3] Open this request spec file:
require 'rails_helper'

RSpec.describe "Projects", type: :request do

end
In this request spec, you want to test that you’re redirected to the
Projects page if you attempt to access a resource that no longer exists. You also want to
ensure that a flash[:alert] is set.
To do all this, put this it block inside the describe block:
require 'rails_helper'

RSpec.describe "/projects", type: :request do
  it "handles a missing project correctly" do
    get project_path("not-here")

    expect(response).to redirect_to(projects_path)

    message = "The project you were looking for could not be found."
    expect(flash[:alert]).to eq message
  end
end
The first line in this RSpec test tells
RSpec to make a GET request to the route /projects/not-here. This route will then be served by the ProjectsController’s `show action.
In the next line, you tell RSpec that you expect the response to take you
back to the projects_path through a redirect_to call. If it doesn’t, the
test fails, and nothing more in this test is executed: RSpec stops in its
tracks.
The final line tells RSpec that you expect flash[:alert] to contain a useful
message explaining the redirection to the index action.
To run this spec, use the bundle exec rspec
spec/requests/projects_request_spec.rb command. When this runs, you’ll
see this error:
1) Projects handles a missing project correctly
   Failure/Error: @project = Project.find(params[:id])
     ActiveRecord::RecordNotFound:
       Couldn't find Project with 'id'=not-here
This is the same failure you saw when you tried running the application using the
development environment with rails server. Now that you have a failing test, you can fix it.
Open the app/controllers/projects_controller.rb file, and put the code
from the following listing under the private line in the controller.
set_project method in ProjectsController
def set_project
  @project = Project.find(params[:id])
rescue ActiveRecord::RecordNotFound
  flash[:alert] = "The project you were looking for could not be found."
  redirect_to projects_path
end
Because it’s under the private line, the controller doesn’t
respond to this method as an action. To call this method
before every action that looks up a project, use the before_action method.
Place these lines directly under the class ProjectsController definition:
before_action :set_project, only: %i(show edit update destroy)What does all this mean? Methods referenced
by before_action are run before all the actions in your
controller, unless you specify either the :except or :only option. Here you
have the :only option, defining actions for which you want before_action to
run. The :except option is the opposite of the :only option, specifying
the actions for which you don’t want before_action to run. before_action
calls the set_project method before the specified actions, setting up the
@project variable for you. This means you can remove the following line from
your show, edit, update, and destroy actions:
@project = Project.find(params[:id])By doing this, you make the show and edit actions empty. If you remove these
actions from your controller and run bundle exec rspec again, all the scenarios
will still pass.
7 examples, 0 failures
Controller actions don’t need to exist in the controllers if there are
templates corresponding to those actions, which you have for these actions.
For readability’s sake though, it’s best to leave these in the controller so anyone
who reads the code knows that the controller can respond to these actions, so put
the empty show and edit actions back in. Future you will thank you.
Back to the spec now. If you run bundle exec rspec
spec/controllers/projects_controller_spec.rb once more, the test now passes:
1 example, 0 failures
Let’s check to see if everything else is still working by running
bundle exec rspec. You should see this:
7 examples, 0 failures
Red-green-refactor! With that out of the way, let’s commit and push:
$ git add .
$ git commit -m "Redirect the users back to the projects page if they
  try going to a project that does not exist"
$ git push
This completes the basic CRUD implementation for your projects resource. Now you can create, read, update, and delete projects to your heart’s content.
Summary
This chapter covered developing the first part of your application using
test-first practices with RSpec and Capybara, building it one step at a time. Now
you have an application that is truly maintainable. If you want to know if
these specs are working later in the project, you can run bundle exec rspec; if
something is broken that you’ve written a test for, you’ll know about it.
Doesn’t that beat manual testing? Just think of all the time you’ll save in
the long run.
You learned firsthand how rapidly you can develop the CRUD interface for a resource in Rails. There are even faster ways to do it (such as by using scaffolding, discussed in Chapter 1); but to absorb how this process works, it’s best to go through it yourself, step by step, as you did in these last two chapters.
So far, you’ve been developing your application using test-first techniques, and as your application grows, it will become more evident how useful these techniques are. The main thing they’ll provide is assurance that what you’ve coded so far still works exactly as it did when you first wrote it. Without these tests, you may accidentally break functionality and not know about it until a user — or worse, a client — reports it. It’s best that you spend some time implementing tests for this functionality now so you don’t spend even more time later apologizing for whatever’s broken and fixing it.
With the basic projects functionality done, you’re ready for the next step. Because you’re building a ticket-tracking application, it makes sense to implement functionality that lets you track tickets, right? That’s precisely what you’ll do in the next chapter. We’ll also cover nested routing and association methods for models. Let’s go!