Writing automated tests
In the last chapter, we saw how we could build a very simple application to track a list of purchases. When we used this application we manually tested that it was working. This may seem like a good idea for now, but when we build bigger applications that have a lot of features, it will take a very long time to test it ourselves in this way. So how do we make our Rails applications maintainable and testable, even as they grow larger?
The answer is that you write automated tests for the application as you develop it, and you write these all the time. By writing automated tests for your application, you can quickly ensure that your application is working as intended. If you didn’t write tests, your alternative would be to check the entire application manually every time you make a change, which is time consuming and error prone.
Automated testing saves you a ton of time in the long run, and leads to fewer bugs. Humans make mistakes; programs (if coded correctly) don’t. We’re going to be doing it correctly from step one.[1]
In the Ruby world, a huge emphasis is placed on testing, specifically on test-driven development (TDD) and behavior-driven development (BDD). This chapter covers using RSpec and Capybara, two testing gems that we can use to test our application is behaving correctly.
By learning good testing techniques now, at this early point of your Rails journey, you will have a solid way to make sure nothing is broken when you start to write your first real Rails application. If you didn’t write tests, there would be no automatic way of telling what could go wrong in your code. Manually testing a large application takes a very, very long time!
A cryptic yet true answer to the question "Why should I test?" is, "Because you’re human." Humans — the large majority of this book’s audience — make mistakes. It’s one of our favorite ways to learn. And of course: "to err is human". Having a tool to inform us when we make one is helpful, isn’t it? Automated testing provides a quick safety net to inform developers when they make mistakes. By they, of course, we mean you. We want you to make as few mistakes as possible.
There are many different types of tests that we can write for our application. Some of the tests could be as small as checking that a method returns a particular value when given certain arguments. These are called unit tests; they test that a single unit of our application is working.
Others can be as large as making sure that when a user performs a certain set of tasks within our application that the application works correctly. These ones are called feature tests; they test that a combination of things in our application work together in unison.
In this chapter, we’re going to look at that latter kind of test, a feature test. We’ll see plenty of examples of unit tests and other kinds of tests throughout this book, but for this chapter we’ll be focussing on just the one: the feature tests.
A feature test typically checks that an entire feature for a Rails application works. For example, one of the features of the things_i_bought application is creating purchases. When we write a feature test for this part of our application, we would want to make sure that at least the user could create a purchase and then immediately view that purchase’s details in our application.
By writing this feature test, we will have an ongoing automated way of ensuring that our code is working as we intended it.
We’ll see a few examples of how to write these feature tests in this topic. Later on in this book, we’ll be writing a lot more in a process called Behaviour Driven Development, or BDD. We’ll talk more about BDD in the next chapter. For now, let’s just familiarize ourselves with how to write feature tests.
Installing and setting up RSpec
To write this feature test, we’re going to add a new gem to our application called rspec-rails. The rspec-rails gem provides us with a testing framework that is widely popular in the Ruby community. [2] In this chapter, we’ll add the rspec-rails gem to our application and use it to write a few tests.
Before we can start writing a test for this application, we are going to need to setup RSpec.
Firstly, we’ll need to add rspec-rails to our Gemfile, inside the same group as another gem called byebug:
group :development, :test do
  gem 'rspec-rails', '~> 5.0'
  gem "debug", platforms: %i[ mri mingw x64_mingw ]
end
Next, we’ll need to run bundle install inside the application’s directory to install this gem.
The final step for setting up this gem is to run the rails g command again:
$ rails g rspec:install
This command will generate three files and one directory:
create  .rspec
create  spec
create  spec/spec_helper.rb
create  spec/rails_helper.rb
The .rspec file contains options for running RSpec. So far, it’s fairly sparse:
--require spec_helper
The lines in this file are automatic command line arguments passed to RSpec. To find out what other command line arguments you could pass, run rspec --help.
|
This one line directs RSpec to require the spec_helper.rb file (located under the spec directory) every time RSpec runs.
The spec/spec_helper.rb includes basic configuration for RSpec, and spec/rails_helper.rb requires the spec/spec_helper.rb file, but will also load our Rails application at the same time. We don’t need to look at these particular files right now.
Now that we have setup RSpec, let’s write our first feature test.
Writing our first feature test
We’re going to write a feature that will test the process of creating posts in our journal. To do this, we can create a new file under spec/features called spec/features/creating_purchases_spec.rb:
require "rails_helper"

RSpec.feature "Creating Purchases" do
  scenario "creating a purchase successfully" do
    visit "/purchases"
    click_link "New Purchase"
    fill_in "Name", with: "Shoes"
    fill_in "Cost", with: 100
    click_button "Create Purchase"

    expect(page).to have_content("Purchase was successfully created.")
  end
end
This test uses RSpec’s generated spec/rails_helper.rb to load the configuration required for this test, as well as spec/spec_helper.rb. When we require rails_helper, this loads our Rails application and makes it available to our tests automatically.
The RSpec.feature block wraps all of the tests for creating a purchase within our application. We use RSpec.feature to group together specific scenarios that we want to test for a particular feature.
Each scenario block inside of this main feature block describes scenarios for creating a purchase. So far, we have just the one, but we could have more. For instance, later on we’ll add another scenario that checks what happens if a purchase’s name is left blank.
Inside the scenario block, we use methods like visit and click_link. These are methods from a gem called capybara that comes pre-installed with every Rails application. You’ll see this gem listed under the test group in your application’s Gemfile:
group :test do
  # Use system testing [https://guides.rubyonrails.org/testing.html#system-testing]
  gem "capybara"
  gem "selenium-webdriver"
  gem "webdrivers"
end
Capybara is a testing tool that allows us to simulate the steps of a user of our application. We can tell it visit pages, fill in fields, click buttons (and links) and assert that pages have certain content. There’s a lot more that it can do too, which we’ll see throughout this book. In fact, we’re going to be using it in every chapter!
Back to the test itself. This test follows the same flow that we have been doing when we go to create a purchase. It visits the /purchases path for our application by using the visit method., just like we would when using a real browser.
The test then fills in the "Name" and "Cost" fields by using the fill_in method. Then, it clicks the "Create Purchase" button with click_button. These methods all come from the Capybara gem.
Lastly, we use the have_content matcher from Capybara to test for there being a message indicating that the purchase was created successfully. This assertion would only work if our purchase creation succeeded. If the purchase creation failed, then we should not see this message and our test would fail.
Notice here that the test reads a lot like plain English. This is an intentional design decision by the creators of Capybara. It’s one of the nice things about Ruby: we can write code that reads almost like English. Other people who read this code, even those who don’t know Ruby, could read it and understand themselves how to test this feature out themselves if they wished.
We can run this test by running this command:
$ bundle exec rspec
When we run this command, we’ll see that the test passes already:
1 example, 0 failures
This test is passing because our creating purchase feature is still working! We haven’t done anything to break this test.
The great thing about having a test like this in our application is that if we do break something, then the test will tell us!
Writing a second scenario
Let’s look at an example by writing another test. This time, we’ll check for what happens if we do not enter a cost for a purchase.
If you try to do this through the application right now, here’s what you’ll see:
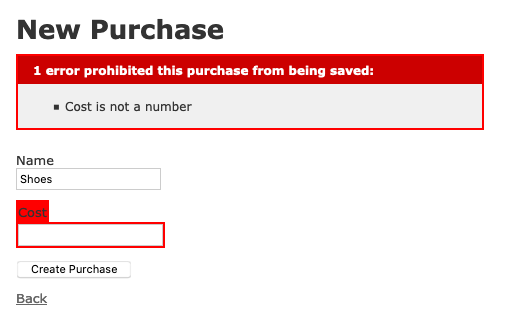
With this newest test, we want to ensure that when we enter a name but don’t put in a value for cost, this error appears. We’ll write a new scenario block inside the feature block to test what happens here:
scenario "creating a purchase without a cost" do
  visit "/purchases"
  click_link "New purchase"
  fill_in "Name", with: "Shoes"
  click_button "Create Purchase"

  expect(page).to have_content("1 error prohibited this purchase from being saved:")
  expect(page).to have_content("Cost is not a number")
end
This test expects that when we fill in the form incorrectly, that the validation message appears. Let’s run our tests one more time:
$ bundle exec rspec
When we run this command, we’ll see that both of our tests are currently passing:
2 examples, 0 failures
This is a good thing, as it means our application is still working as we want it to. Now, what happens if, let’s say, in a few months time you come back to this application and accidentally (or on purpose!) delete the cost validation line from the Purchase model.
class Purchase < ActiveRecord::Base
  validates :name, presence: true
end
Well, your tests will catch this mistake. If you delete this line and run the tests again, this is what you’ll see:
Failures:

  1) Creating Purchases creating a purchase without a cost
     Failure/Error: expect(page).to have_content("1 error prohibited this purchase from being saved:")
       expected to find text "1 error prohibited this purchase from being saved:"
         in "Purchase was successfully created.\nName: Shoes\nCost:\nEdit | Back"
     # ./spec/features/creating_purchases_spec.rb:20:in `block (2 levels) in <top (required)>'
While our first test is passing, this second is one is now failing. This test shows that there’s been a change in the application and that the change disagrees with the test’s view of How Things Are Meant To Be. This test is giving us a warning that hey, perhaps we were too quick to make that change. This is the saving grace of tests: they prevent you from making easy mistakes like this one.
Let’s go ahead and undo that change now:
class Purchase < ActiveRecord::Base
  validates :name, presence: true
  validates :cost, numericality: { greater_than: 0 }
end
Now if we run our tests again, we’ll see that they’re back to passing:
2 examples, 0 failures
Great!
Summary
Writing tests for your application’s code provides a quick-and-easy way to have an automated process of checking your application is behaving correctly. If a mistake is made, the tests will (most likely) alert you to that change and you can decide from there if you want to want to change the code, or the test.
You’ll apply what you learned in this chapter to building a Rails application from scratch in upcoming chapters. From the next chapter, you will use RSpec and Capybara to write tests that describe the behavior of your application, before you write code. Then you’ll implement the behavior of the application to make these tests pass, and you’ll know you’re doing it right when the tests are all green.
This process is called Behaviour Driven Development, and it’s how we’re going to be working for the remainder of this book.